Understanding a ML model from scratch.
Build your first ML model.


Photo by Possessed Photography on Unsplash
Introduction:
Machine learning is a vast field, especially in today's era dominated by ChatGPT, Gemini, and various AI models. Many aspire to become AI or ML engineers but struggle to find a starting point.
Assuming some hands-on experience with Python, this blog will guide you through building your first machine learning model.
Follow along and begin your journey into the world of ML.
Chapter 1 Methodology :
In this blog, we'll focus on the KNN model to understand its workings through an example: a symptom-to-disease predictor.

In an ML model, we pre-train it on a dataset so that it can identify or operate flawlessly on real-world data provided by the user.
Here, the user provides symptoms to the model, which then calculates based on the training set provided earlier, operates on the new inputs, and predicts a disease.
How does a model work ?
A machine learning model learns patterns and relationships from data, using this knowledge to make predictions or decisions without being explicitly programmed for the task.
Just as a program runs on different algorithms, a machine learning model runs on various models such as Linear Regression, K-Nearest Neighbors (KNN), Decision Trees, Random Forest, Support Vector Machines (SVM), Neural Networks, etc.
These are a few ML models suitable for beginners to learn and start with.
Chapter 2 K-nearest neighbor (KNN):
KNN belongs to the supervised learning domain and finds intense application in pattern recognition.
This ML model distributes a dataset/training data into multi-dimensional space (2D).
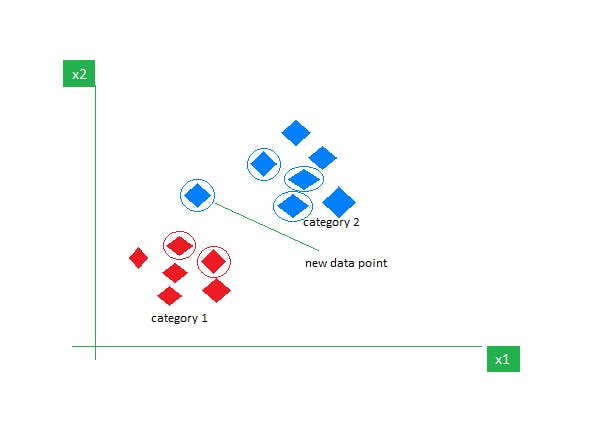
Fig.1.0
New input/real data we provide is spaced somewhere in the multi-dimensional space in which it has distributed the training set.
Like in Fig.1.0 the new data point is placed between category 1 and category 2, the new data point is circled in green circle.
Now, as the name suggest K-nearest neighbor, we have a variable K, which is the radius of a circle which we will be drawing hypothetically,
i.e give K any integral value during the training of you KNN model, and with that value of K as a radius, draw a circle around the new data point.
Now, with Euclidean Distance (Fig.1.1), measure the distance of the new data point and every other node present in the region of the circle we drew previously with the radius K.

Fig.1.1
After calculating the Euclidean Distance (Fig.1.1), the node with which the new data point had the least distance is going to the category which the new data point will be joining.
Suppose, In FIG.1.0 the new data point is near to the category 2, the new data point will be considered as a part of category 2.
Chapter 3: Exploring Python Libs
Python is a versatile, dynamically-typed language with a vast standard library and an extensive ecosystem of third-party packages and frameworks. Its widespread adoption spans various domains, from web development to data science and machine learning. Some of the modules, libraries, and frameworks we'll be using include:
Pandas: A library for data analysis, facilitating powerful and flexible mathematical analysis.
NumPy: A Python library primarily for working with arrays, aiding operations and supporting large, multi-dimensional arrays and matrices.
String: Contains functions for processing standard Python strings. While not explicitly needed in NLTK, it simplifies input cleaning.
NLTK (Natural Language Toolkit): Utilizes Python modules to make natural human language readable for a computer or system.
Scikit-Learn: An open-source Python library offering a range of ML models, preprocessing techniques, cross-validation, and visualization algorithms.
Chapter 4 Including all necessary modules :
Now that we understand how a KNN model works, we can start implementing it.
Python offers many libraries that act as pillars for ML. We've introduced them earlier, and in this part, we'll see how they're utilized in making an ML model.
String module : String module is used to operate on the input of the user, It is not explicitly needed in MLTK, but we use so that input cleaning gets easier, like removing puntuations, which help a NLTK- tokenization,
NLTK : In a NLTK there are various methods in which a natural human level language is converted into a form that a machine understands, it helps us turning a unstructured data into structured form.
Tokenize : Tokenizing conveniently splits up text word by word or by sentence, it allows us to work with smaller pieces of text that are still relatively coherent and meaningful.
Stopwords : In a natural language there are words which are senseless for a computer like, 'in', 'is', 'the', 'an'. These words are filtered out using Stopword methods.
Sckit learn : It provides us various functions which are needed in a ML model training and operating,
Sklearn.feature_extraction module : Extract features in a format supported by machine learning algorithm from dataset consisting of format such as text and image.
TfidfVectorizer class :TfidfVectorizer performs the TF-IDF transformation from a provided matrix of counts.
where TF-IDF stands for Term Frequency - Inverse Document Frequency.
          import pandas as pd
          import numpy as np
          import matplotlib.pyplot as plt

          import string
          import nltk
          from nltk.corpus import stopwords
          from nltk.tokenize import word_tokenize
          from wordcloud import WordCloud

          from sklearn.feature_extraction.text import TfidfVectorizer
          from sklearn.model_selection import train_test_split
          from sklearn.metrics import accuracy_score, classification_report

          from sklearn.neighbors import KNeighborsClassifier
Sklearn.model_selection : This sets a blueprint to analyze data and then using it to measure new data, selecting proper model allows us to generate more accurate result.
Chapter 5 Code KNN model :
Having included all the necessary and compatible modules for our KNN model, we now include the dataset we're working on.
df = pd.read_csv("Enter your dataset path,")
df.drop("Unnamed: 0",inplace=True,axis=1)
df
if you're working on google collab or any other web based platform, make sure to upload your document there and then copy the file path.
As we have our dataset ready with us, we shall now separate the columns for uniquely identifying or operating on the columns, and downloading 'punkt' and 'stopwords' to use them in cleaning our dataset.
for col in df.columns:
    print(col,": ",df[col].unique(),"\n")

nltk.download('punkt')
nltk.download('stopwords')
We need to clean our dataset and the user input because sometimes the user input and our dataset has some words which may make sense to human level language but not for computers, and it also helps in tokenization of the words which make sense to our computer.
stop_words = set(stopwords.words('english'))

def clean_text(sent):
    #remove punctuations
    sent = sent.translate(str.maketrans('','',string.punctuation)).strip()

    #remove stopwords
    stop_words = set(stopwords.words('english'))
    words = word_tokenize(sent)
    words = [word for word in words if word not in stop_words]

    return " ".join(words).lower()

df["text"] = df["text"].apply(clean_text)
After removing the stopwords from our data, now is the time to train a model.
For training our ML model we first spilt the dataset into two parts in which we use one to train the model on and the other to test over the dataset, all this is done by modules inside Skit-learn, so for now we need not to worry on how it's done. But if you are interested in going deep into this niche, do look out how it's done.
#Split data into train and test set
X_train, X_test, y_train, y_test = train_test_split(df["text"], df["label"], test_size=0.2, random_state=42)
here, we use 20% of our data for testing i.e test_size, and random_state is to ensures that the splitting of data into training and testing sets is reproducible. This means that if you run the code again with the same random state value, you will get the same train and test sets.
The texts is vectorized, and separated as training set and testing set.
# use tfidf for text vectorization
tfidf_vectorizer = TfidfVectorizer(max_features=1500)

tfidf_train = tfidf_vectorizer.fit_transform(X_train).toarray()
tfidf_test = tfidf_vectorizer.transform(X_test).toarray()
The model we will be working on is well known by now, KNN.
so we integrate KNN into our code by using inbuilt function and set the value of 'n'.
# knn will be our first model
knn = KNeighborsClassifier(n_neighbors=1)
knn.fit(tfidf_train, y_train)
After we have made our training set ready, we are ready to test it and predict the test case. For that we have a inbuilt function ready called predict()
predictions = knn.predict(tfidf_test)
Once we are done with our prediction, we are ready with our first working Ml model, but we yet need to write a function for displaying the result of our prediction.
We can write a simple function as....
def report(y_test,predictions):
    """Function to create classification report"""
    accuracy = accuracy_score(y_test, predictions)
    print(f'Accuracy: {accuracy:.2f}')
    print(classification_report(y_test, predictions))
This function displays the accuracy of our model after running it on our testing set.
Now to get user input and to predict the symptoms we need to write 1 more simply function. Let's just name it make_pred().
def make_pred(model,text):
    """Function to make prediction on single data instance"""
    text = clean_text(text)
    tfidf = tfidf_vectorizer.transform([text]).toarray()
    disease = model.predict(tfidf)

    return disease[0]
And to use this function we can simply take user input as a string in a variable and pass that variable to our make_pred() function.
symptom = "pimples,tan,heartburn"
make_pred(knn,symptom)
We have gained a comprehensive understanding of the code required to build our first machine learning model. I hope you found the explanations clear and the examples helpful. With this newfound knowledge, I trust you feel empowered to embark on your machine learning journey with confidence. Happy coding!
If you're interested in more beginner-friendly content, make sure to follow me on my other social media handles. I'm also open to joining your next hackathon team. Feel free to DM me.